Feeds:
Posts
Comments

Posts Tagged ‘Simple tools’

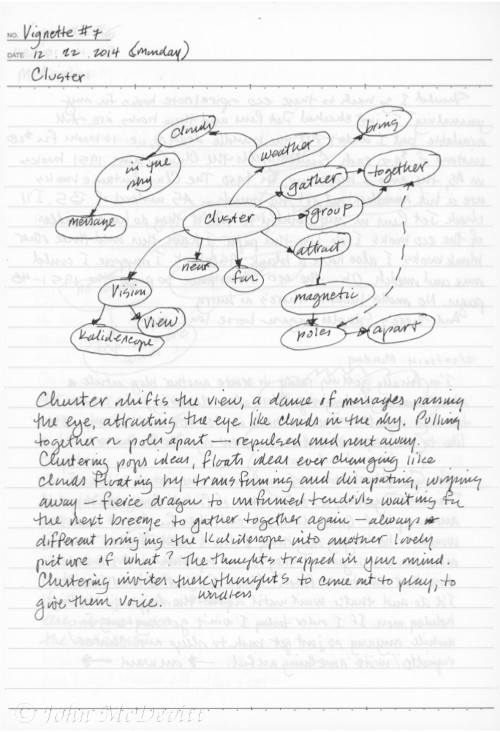
I learned clustering years ago from Gabriele Rico’s wonderful “Writing the Natural Way” but I’ve neglected clustering until I came across past clustering and vignettes that revived my interest. Actually I started a new notebook three months ago devoted entirely to clustering. Alas, I only put six clusters / vignettes into that book until today when I clustered on the word / idea “CLUSTER.” But before I share this latest cluster here are a few ideas from the book.

Our design minds (Rico’s term for the right side of the brain) are filled with imaginative ideas and clustering is a sort of brainstorming process that frees these images and makes them visible. Clustering is a journey we begin without knowing or concerning ourselves with outcomes. Clustering only takes a few minutes. At some point during the clustering your mind will suddenly know what to write and then you shift into writing a vignette which only takes a few minutes. Now here’s my attempt at clustering “cluster” — the raw vignette / first draft.

clustering

Cluster shifts the view, a dance of messages passing the eye, attracting the eye like clouds in the sky. Pulling together or poles apart repulsed and sent away. Clustering pops ideas, floats ideas ever changing like clouds floating by transforming and dissipating, whisping away — fierce dragon to unformed tendrils waiting for the next breeze to gather together again — always different, bringing the kaleidoscope into another picture of what? The thoughts trapped in your mind. Clustering invites these wordless thoughts to come out to play, to give them voice.

I didn’t time myself as I should have but this entire process only took 5 to 10 minutes. The next thing would be to give the vignette a rest and come back later for additional work (or not).

Here’s a [It’s my turn again] vignette after clustering on TURN from Writing the Natural Way on Oct. 9, 2011.

It’s my turn again where / when I flip over and repeat but am I repeating the same things over and over? My turn is another invitation to return for another look, to see / hear / taste / feel now, to spin on the axis of the moment. Do I remember my last turn? Should I? Each turn is a new chance, an opportunity for now, the again that’s always different than last time. The again that puts last time in proper perspective into the past of has beens that can be no more. My turn is an invitation to new creativity —  now.

I wrote this one [Wonder and the Fragility of Ideas] from Writing the Natural Way, on October 11, 2012

My head bobs up and down anxious, no, eager (because we don’t like worry words and anxious is a worry word). We like words like eager, a puppy aiming to please, a child wondering about his world, living in the moment, the wonder of Now. Wonder sneaks up on me when I sit quietly. No thunder — who needs thunder? Thunder is suspect, drawing attention to itself with noise rather than substance. When I don’t know what to wonder about, wonder tells me. All I need to do is pay attention. PAY ATTENTION! ATTENTION means ATTENTION!

Read Full Post »

MaxThink and OrgMode make good partners when set up properly. The hardest part of the setup is getting the information from MaxThink to OrgMode. The first time I tried I wrote a perl script that accepted the MaxThink file and spit out an OrgMode compatible file. The script was rough around the edges and I never finished it because I discovered a much simpler solution.

MaxThink has an Options choice from the main menu that takes you to a series of screens where you can customize Max to your liking. Today’s tutorial will show you how I set up Max to suit the way I work and most important, to output files in OrgMode format.

Click to enlarge

Click to enlarge

Access Options using the Options choice from the main menu. The screenshot above shows Screen 1 of 6. Navigate between the different screens using PageUP or PageDN and use the arrow keys within each screen. IMPORTANT! The first thing you must do when creating a new set of options is  give the Description (first item on screen 1) a new name. This ensures that you don’t accidentally change an existing setup.

The rest of the entries on this screen allow you to set preferences. I recommend you read the manual for an explanation of each screen. You can safely ignore the Date Stamp option, Max doesn’t do dates after the year 2000. I never use dates with Max. No reason when you are brainstorming.

Click to enlarge

Click to enlarge

Screen 2 controls the screen settings. I’ve never changed the defaults. Again, look through the manual for explantions of the settings.

Click to enlarge

Click to enlarge

I’ve probably played with this screen more than any of the others. Here’s where you can change the colors. The screenshot above shows how I set up mine. It’s easy to experiment because you can always change what you don’t like. Hint: make a quick note of the number sequence you like so you can return to it.

Click to enlarge

Click to enlarge

Here’s the screen where you set up Max for printing. I don’t use print but you could if you are running Max inside dosemu. I changed the Page Formats to the maximums and the minimums because when you WRITE a file (the way I move the info from Max to Org) you don’t want the output formatted for a printer. Be sure to set print headers and footers to ‘n’ for each.

Click to enlarge

Click to enlarge

This screen, specifically the Numbering Scheme on the first line is how you tell Max to WRITE the file with asterisks instead of numbers, etc. This is because OrgMode uses asterisks to identify outline headings with one asterisk as the top level, two one level down, three two levels down and so on. My setup gives me six levels if needed.

I also changed the next two items to y to align left and n to attach prefix.

Click to enlarge

Click to enlarge

Screen 6 finishes the setup for Writing to an OrgMode compatible file. Use my settings. Change the indent between levels to 0, make sure spacing formats are set to their respective minimums and enter the control codes that will work with OrgMode. I deleted the topic end sequence and changed the Line End Sequence to 10\ to be Linux compatible, i.e. single line feed.

I haven’t run into any situations yet where my orgmode setup didn’t work (so far). When you want to transfer an outline from MaxThink to OrgMode all you need to do is choose WRITE from the main menu, enter a file name and hit the enter key. Bingo, switch to OrgMode and use the file insert command to insert the contents of the file you just created. I’ll explain more about this phase next time.

As always, if you have any questions please leave a comment or feel free to send me an email.

Read Full Post »

Screenshot from 2014-03-08 13:18:59

I have an original, 221 page printed Max94 manual that I’ve kept preserved for 20 years. After I scanned the entire manual and made a pdf file yesterday I contacted Neil Larson, the brain behind MaxThink and received his permission to upload the pdf file so anyone interested may download the manual for their own use.

Left click here: MaxThink to view the MaxThink manual or

Right click here: MaxThink and choose Save Link As to download.

As promised, I’m working on the tutorials. Making the manual available was a priority. Enjoy, please leave feedback and please respect Neil’s copyright.

And please be patient. The manual file is 8.5 Mb and takes a few seconds to view or download (depending on download speed).

Read Full Post »

Org-mode is my choice for a writing environment. Gedit is the Gnome default text editor. Tonight I installed Leafpad, a simple text editor and made it the default (instead of Gedit) for automatically opening txt files. Leafpad isn’t just fast, it loads instantly, exactly what I need when I want to write a short note without fussing or to have a quick look at a text file. No frills like spell checking, word count, etc., just raw speed and simplicity. Sometimes simple is best.

I loaded a few text files to test and play with Leafpad. I found an old mind dump, actually a dump from my Neo: neo_dump_05_26_09.txt. Neo has eight files and I must have decided to clear Neo out. I thought two of the files would make for fun musings this week so here goes:

File #1 — Friday, Dec. 12, 2008 — Morning Pages

An experiment this morning. Instead of the dry, stupid, diary crap morning pages, I clustered around the word paralysis. Because I was stumped and uncertain of what I wanted to think about this morning.

My left brain likes concrete answers. It wants to know what’s likely to happen before I get started. My right brain wants to play. Right brain just wants to have some fun. Let’s play let’s find out.

My right brain loves the contrast while old left gets uncomfortable when I’m not organized, when outcomes are uncertain. When you play what if, you might not succeed, you might even fail. Is that so terrible? Not for a playful person it isn’t.

Contrast. The risk of success is worth the risk of failure. Failure is such a terrible thing in our upcoming (I wonder what I meant when I wrote upcoming? probably upbringing). Catholic school in the 50s taught that failure was a sin. Well, that sin is giving in to temptation. Better explanation is that sin is a mistake and mistakes are bad things.

How can a person possibly stop mistakes? Can’t be done. Minimize by paying attention, but stopping before the fact? That’s paralysis. Not doing because of fear of failure [and success]. It’s so much easier to stick with the known. Who knows what lurks out there. Who knows what might happen if the silly and irresponsible right brain takes center stage.

Right brain says let’s find out. Let’s play what if while left brain sits paralyzed by indecision. Just do it. Not recklessly Mr. left brain says. OK then, we’ll work together. You don’t judge ahead of time or stop me because you think I’m being silly and after I play awhile, I’ll be quiet and let you organize and make sense of my playful discoveries.

File #5 — no date

Years later I read the same book with different eyes, different mind and the tumblers click into place and the safe opens. How did I find that combination?

What makes us want to get out of bed in the morning?

PS — I wrote / assembled this post using org-mode

Read Full Post »

OK, you’ve been free-writing, letting the words flow without judging or editing and you’ve exhausted your idea pool or think it’s time to stop. What do you do with the mind dump, first draft now?

I wondered the same thing and wished someone would program a decent text editor for writers. Most, if not all, text editors are written with computer programmers in mind. They are powerful, fast and can do some amazing tricks, most of which are useless for a writer.

Writers are supposed to use word processors (I wonder who started that myth?). I seldom use a word processor and why writers think they should write using a program designed for secretarial tasks in a business office puzzles me. (reminder to self — write an article explaining why word processors suck for creative writing).

Creative writing needs good software that helps instead of getting in the way. What if I had a good text editor that could help make sense of a first draft? What if I had a good text editor that helps me organize my thoughts? What if I could start at the beginning of a shitty first draft and whenever I found a word or phrase that resonated, highlight the word or phrase, press a key combination and send that word or phrase to a list?

I got the idea when using NoteTab Pro which has a neat function that lets you use a file as a ‘pasteboard’ so each time you copy anything from another file, the text appears in the ‘pasteboard’ file. Keep going and you create a nice list of all the ideas culled from your draft.

Unfortunately, NoteTab is a windows program and I need a native Linux editor. I discovered a solution that works even better than the NoteTab ‘pasteboard’ function.

I like gedit, the default editor for the gnome desktop and use it a lot. Gedit has a tools plug-in that let’s you create scripts that can either run from a pull down menu or an assigned shortcut key combination that runs the script when pressed. I figured out a script that appends a list to the end of a file and it works without taking my hands off the keyboard.

I move through the file using the arrow keys. When I find something I want to add to the list, I highlight the selection using Ctrl/shift and the right arrow key, then press Ctrl/F12 and the highlighted text is appended to the end of the file as the next item in the list.

When I’m finished, I can simply copy the list and paste it into a new file. Another gedit plug-in lets me sort the list alphabetically and I can move items up or down the list easily using the Alt key with the up or down arrow — neat ways to help distill and organize the meat of a first draft.

I set the tool to use the current selection and append the output to the end of the file. Here’s the script:

#!/bin/sh
sed ‘s/[a-z]*/\n&/’

I tested my idea with this article. After writing the first draft on my Neo, I plugged Neo into the USB port on my desktop and dumped the draft into a new file in gedit. Then I played around with a list. It worked fine, but since my first draft was reasonably coherent, I pulled another neat gedit trick instead.

I opened another empty file in a new window and simply dragged and dropped the text I wanted from the draft into the new window. (Gedit doesn’t delete the original text so you are moving a copy of the selection). Then I edited and added to the second draft until I was satisfied.

The point? Go ahead and make a mess with your first draft. The job of the first draft is to get your thoughts out onto the page. Editing comes later. A tool like my list builder can help. And until I find the perfect text editor for writers, I’ll build my own any way I can.

Read Full Post »

MaxThink satisfies a need for thinking with a computer that I wrote about 30 years ago and reproduced in a post on September 12, 2009, Time Travel: Musing About MaxThink & More… I invite you to hop back and read the earlier post before continuing.

MaxThink (for DOS) opening screen

I’ve been using computers for about 30 years and in all that time, I’ve only found one program that comes close to the genius of Neil Larson and his old DOS version of MaxThink, the unique and wonderful idea processor, and that’s Brainstorm, a thinking and planning aid program that I used and liked for a few years on my Windows desktop machine. Brainstorm was close but not quite, lacking some of the key features that made MaxThink special.

I began migrating from Windows to Linux almost four years ago and made a complete break over a year ago. I do everything on my Linux Mint 9 Desktop now. Brainstorm runs under Wine but loses some of it’s best features and MaxThink for Windows won’t run at all under Wine (I tried the demo twice last week with no luck), so I’ve installed my old DOS copy of MaxThink94 using DosBox, a DOS emulator created to run old DOS games. MaxThink runs perfectly with DosBox and I couldn’t be happier.

My fingers never leave the keyboard when I’m cranking out ideas and reorganizing them with MaxThink. The keystrokes are intuitive and I was up to speed in a matter of a few days. Not having to use the silly mouse is a huge advantage when you are thinking and typing away.

At first glance, MaxThink is a powerful outliner, but the real power is under the hood. MaxThink came with a fat, printed manual that by some miracle, I still have. Neil’s book is more than a user manual for MaxThink. It’s a well written tutorial on ways of thinking: Evaluative thinking with the Prioritize command, synthesis thinking using Binsort and Randomize to combine information in new ways, curiosity or experimental thinking with the Lock command, systematic thinking using Get, Put and Gather, creative uses of the Sort command, and one of my favorites, segmented lists.

And yes, I end up with a well thought out, complete outline. I can’t print directly, but Neil provides a Write command that saves outlines to an ASCII file that opens in my favorite text editor where I can print the way I prefer anyway.

The journey is everything in creativity and MaxThink makes that journey more productive and pleasant. I created a two and a half page outline mirroring and assisting my writing as I go through lesson three in WritePro. MaxThink helps me to generate new ideas, to discover relationships among ideas, to organize my ideas and to preserve them so I’ll remember and build on the ideas.

The synergy is amazing. Begin a new writing project with an open mind and a blank screen in your editor. Write whatever comes to mind without judging or editing. When you go back for a look, pick out the good stuff, the best ideas and start a MaxThink outline to help organize those insights and discover new ones. Then back to the editor for revisions or a complete re-write. Back and forth between insight and editing until the project is complete. Love the creative journey which is never complete because when one project is finished another beckons.

Read Full Post »

I finished the last of six new photo books late Sunday night, tweaked one of them just a bit on Monday morning and ordered hard copies from AdoramaPix. The sale on 8×8, 14 page photo books ended Tuesday. Who doesn’t like a sale, especially one this good? I saved $15 + sales tax on each book so when my latest order arrives next week I’ll have a 10 volume library of my best images and $160 in savings.


This is an image of the cover from one of the photo books I ordered on Monday. All of my photo books use the same simple template inspired by a wonderful little book, “On Reading” by Andre Kertesz: White cover with photo, simple title, my name in a smaller, lighter font and one photo with a generous white border on each page.


Here’s an example of one of the inside pages from this photo book. As I mentioned in my previous post, Adorama’s (or your vendor of choice) on line templates will suit many people. I used Scribus, an open source desktop publishing program to format and lay out my books before uploading the final version to Adoramapix. It took less than an hour to upload and create six books using my method.

When you fire up Scribus, you get a setup screen that allows you to choose the book size, number of pages (you can add or delete pages any time), margins and other page settings. I set my book(s) up as 8 inches by 8 inches. I accepted the default margins of .56 inches for right, left and top. I set the bottom margin to .88 inches and chose 16 pages — Front cover, back cover and 14 internal pages.

I moved the bottom margin up slightly because I wanted each image to look centered on the page. If you center an image vertically, it looks too low on the page because of a quirk in the way our eyes see things.

Putting your image on the page is easy. Draw an image frame in the middle of the page (exact placement and size don’t matter). Right click and select Get Image. Pick the image you want from the drop down file window, click and the image will appear in the frame.

Then right click and choose adjust frame to image. To get the image where you want it to go, click Align & Distribute from the Windows menu. A sticky sub window will pop up. There are 10 align buttons in the window. Choose relative to: margins then click on center vertical and center horizontal and you’re there. Just a few mouse clicks places your image quickly and easily.

On of the neat things about Scribus is the sticky windows stay until you dismiss them so the window will be there for the next page and so on.

The cover takes a bit more work. I use a smaller version of one of my images on the cover so I need to size the frame so suit the cover design. Follow the same procedure to get your image into the frame. Then right click on the image and click properties. The properties window has all the properties of the image. Click image then check off scale to frame size (proportional) and the image will shrink to fit the frame. If the image doesn’t fit the dimensions exactly, you can fiddle with the frame to get the image to the size you want. Then click on adjust frame to image.

Drag the image to where you want it vertically then click to center between the left and right margins. Draw a text frame where you’d like your title, enter the information via the text editor where you can choose font, size, alignment, etc.

So why go to all this trouble when you can upload your photos to Adoramapix and use their online tools? Glad you asked. Scribus can output a high quality PDF file of your book. I use this interactively because all design is a recursive back and forth until you are happy with the results. And when you are finished you have a high quality ebook.

I ended up doing more triage with my Red Bank book as I went along. Two of the images just weren’t right for the book so I found better ones, edited them and loaded them instead. The page order wasn’t quite right either so I moved pages around in Scribus until I was satisfied. It’s very easy to move pages. Simply pick move page from the page menu then tell Scribus where to put the page relative to any other page.

When you’re ready to upload your images, choose export/save as image and Scribus will export each page as a jpeg file. For my 8×8 book, each page is exactly 2400 pixels in each dimension (300 dpi) and 100% quality. Scribus writes each page with the book name and sequential number. Takes a minute or two.

When you log in and choose to create a book, you go through the steps of picking the cover type, the size, number of pages, etc. Then click upload from your computer, select the image files and within a few minutes all images will be uploaded.

I chose a custom book with no template. The next screen lists all the images on the left, empty pages (in pairs on the bottom) and the page(s) you are working on in the main window. With my method, I simply drag the image and drop it anyplace on the page then click size to page. It’s fast and easy. Each page only takes a few seconds.

I haven’t figured out how to do the spine lettering with Scribus so I pick the text tool and type in my title and my name. You must rotate the text 90 degrees and size it by hand. Not difficult but a bit of a pain. When you’re done, click preview where you can review your book. If all is well, then click order and follow the prompts.

If you aren’t ready to order, your book will be saved for 90 days. I believe you can upgrade for something like $24.95/year for unlimited storage.

It’s lovely to have an archive quality ‘real’ book you can hold in your hands and pass on to future generations. It’s also nice to have a high quality e-book for viewing on your monitor screen. When I’m proofing my books I use the dual page display in Adobe reader. The book will display exactly the same as the printed version. The image is a bit smaller 82% on my screen but large enough to enjoy.

The real treat comes with a full screen display. Each page fills the screen vertically and because the book has been formatted at 300 dpi, the typical 96 ppi lcd screen displays each page with no loss of quality.

If anyone has questions about using Scribus for photo book creation, feel free to leave a comment or send me an email message. I’d love to help as best I can.

Read Full Post »
So you’ve decided to make a photo book. Where do you begin? Start with a concept, a theme for your book. What’s the book about and what kind of photos will I include? When I made my first photo book a few months ago, the theme was easy. I had dozens of photos from my grandmother’s life and I wanted to tell her story, at least part of it anyway. My next project was to make two photo books of my best images from my year in Saigon, one B&W and one in color.

Here’s the cover of my latest project: “Flowers — A Closer Look.” I haven’t ordered a print version of the book yet but I do have a finished e-book. The ability to make high quality photo e-books is one of the main reasons I’ve chosen to use a desktop publishing program for page layout and book construction. When I finally decide to have the Flowers book printed I’ll use Adoramapix. Adoramapix has printed four photo books for me so far and they’ve done a marvelous job with each. You won’t be disappointed in their work.

When I’m ready to submit my photo book to Adoramapix, I simply upload my pages as individual jpeg files and use their online flash app to quickly and easily add my preformatted pages to the new book. In other words, I do all my page layouts offline using Scribus then complete the book using the Adoramapix flash app.

As an alternative, Adoramapix has dozens of preformatted templates that make it easy to create a photo book. Most people will be very happy using one of these templates. Me? I’m climbing the steep learning curve of Scribus and I’ll explain why in detail in a subsequent post.

Let’s get back to the subject at hand, first things first. Once you decide on a theme for your photo book, it’s time to gather and sift through your images. I create a new folder and name it accordingly. For instance, my flower folder is simply flower_book. My Saigon B&W folder is saigonBWbook. Then I gather scattered images and make copies that I put in the new folder.

Once I have all my images in one place, I go through a triage process. If the image isn’t good enough or I decide to leave it out, I delete it. Remember that only copies go into this folder so all my originals are safe. I may end up with more images than I can use but that’s OK. I’ll make final decisions as I work on the page layouts.

Adoramapix expects your images to be 300 dpi and either tiff or jpeg format in sRGB color space (even if your images are B&W). I load each image into my photo editor and convert to sRGB (it’s easy). I prefer one photo on each page and I resize the image (making sure it’s 300 dpi) to fit my page layout. When I say resize, I mean downsize. If the version of the image I’ve chosen is too small, I’ll either dig out a larger image or rescan.

For an 8 inch X 8 inch photo book, I’ve been sizing my images so I get a nice wide white border on each page. This means about 4 x 6 or 4 x 5 for rectangular images and 5 1/2 inches or thereabouts for square images.

While in my photo editor I make tonal adjustments and add moderate sharpening as needed. In a few instances, I’ve rescanned to get a better image. The main thing here is to tweak your photos so they will be ready for the next step.

First things first means choosing a theme, then collecting, sorting and preparing your images for the next step: Either creating a book using a desktop publishing program like Scribus or uploading directly to Adoramapix. I use Adoramapix as an example because I use and like them. The principles remain the same no matter who you choose to print your photo book.

One of the real benefits of this first step is it forces you to choose and organize your best work and assemble it in one place. My images are all over the place but as I build each photo book, I know where to find things and can easily back up.

I’ll explain my next step(s) in the next installment in this series. Stay tuned…

Read Full Post »

Among the mother lode of old photographs my mother found in her bottom dresser drawer was an old photo of my grandmother (Frances K. Sullivan) with her Uncle Harry (Clifton). My grandmother was born in 1888, the photo was taken around 1898 so grandmom was all of ten years old. I set out to restore this photo as best I could.

Here’s a scan of the original that I made for illustration purposes. It’s a faithful reproduction of the original and not suitable for restoration.

Here’s the scan I used as the basis for the restoration. I made the scan on my Epson V600 flatbed scanner using VueScan Pro software. I scanned 48 bit RGB tiff at 1600 dpi. The high resolution and the color made it easier to isolate damage once I got the scan into Picture Window Pro for editing. I learned these two tricks from Ctein’s excellent book: “Digital Restoration from Start to Finish — Second Edition.”

Here’s where I am now, a work in process. Am I done yet? For now yes, but I expect a better result as I learn more. This was a tough one.

I experimented with different scan resolutions. I played with scanning as B&W, but in the end, I followed Ctein’s advice and used the color scan as the basis. I extracted a monochrome version from the color scan using the channel mixer monochrome transformation in PWP. The idea is to combine one or more channels into the cleanest possible B&W image.

Quite a bit of the damage was blue so I boosted the saturation of the color image by about 60% to exaggerate the damage. This made it easier to make masks of the damage.

I still had to do most of the heavy lifting by hand. The toughest issues were reconstructing my grandmother’s mouth where the emulsion was missing and getting rid of the massive stains across the front of the photo.

I’m still not satisfied with grandmom’s mouth. Believe me, reconstructing her mouth was a serious challenge.

Digital restoration has a steep learning curve which is why I picked this image for practice. I figured if I can restore this one, the next one will be a lot easier. I haven’t used masking all that much in the past. Making good masks is an art form and another steep learning curve.

I think I’ll put this image aside for now and work on my next challenge. I have a photo of my grandmother’s grandmother (my great great grandmother) that was taken well over 150 years ago. It’s a simpler portrait that appears to be in better condition. I’m eager to show a finished restoration print to my granddaughters. I can tell them this is a picture of your great great great great grandmother. Hmmm. This is fun.

Read Full Post »

Dragonstar made a nice comment about my latest (April 2) The Weekend in Black and White contribution: Trees: Tone & Texture — Ceres 2010. “One day I must try to understand what you do with your negatives…” Margaret Gosden is also interested and I’ve been meaning to write a few new tutorials (it’s been too long), so…

I decided to kick off the series with an introduction that recreates the sequence of steps I took to improve the tonality of the scanned negative prior to sharpening. The illustrations are screenshots from Picture Window Pro. Click to enlarge so you can see the details.

Click to enlarge

The image on the left is a medium resolution (1410 dpi)16 bit scan I made using VueScan with my Minolta Scan Dual III film scanner. I did some preliminary rough tonal adjustments using curves in VueScan. I did the fine tuning with PWP.

You can see the histogram and my adjusted curve in the Brightness Curve dialog in the middle of the screen. I felt the shadows needed some darkening and the overall image a contrast boost.

Click to enlarge

This screen shows the same before and after images with the alternate view of the Brightness Curve dialog. It’s easier to see the curve I applied.

The dialog shows the existing histogram on top and the new histogram on the bottom. I established two control points using the double headed arrows, one for the shadows and another for the highlights. I moved the bottom of the shadow arrow to the left and the highlight arrow to the right.

The new curve is superimposed on the histogram display. The image on the right is the result. It doesn’t take much to make big changes. As you can see, I moved the shadows just enough. I anchored the highlights and boosted them the tiniest bit. If I hadn’t anchored the highlights, the entire curve would have been pulled down.

The result is a steeper curve which increases contrast, deeper shadows and a wee boost to the highlights.

Click to enlarge

Here’s where I applied a bit of local contrast enhancement. The unsharp mask dialog shows Amount = 10% / Radius = 30 / Threshold = 0, very conservative settings. Some people use amounts of 20% or more and radii of 50, 60 or more. I use higher settings sometimes depending on the image.

Local Contrast Enhancement (LCE) can work magic on some images. I use it all the time now. Rather than try to explain how LCE works, here’s a link to a good tutorial on the subject.

http://www.luminous-landscape.com/tutorials/contrast-enhancement.shtml

The next few steps (final sharpening and size reduction for the web) were done using Gimp. The Gimp can’t handle 16 bit files so I converted and did a save as 8 bit (different file name) and opened the file in the Gimp. I sharpened this image using smart sharpening. I’ll get into different sharpening methods in another tutorial.

Think of this article as more introduction than full blown tutorial. Next time I’ll get into more details.

Read Full Post »

Older Posts »